|
|
|---|
Digital Photo Fantasy Nature’s Desktop - The Grand Canyon Rock ‘n’ Roll Legends - The Moody Blues John Denver - Rocky Mountain Highs Functional Description Digital Photo Fantasy
Each Digital Photo Fantasy setup contains the following components:
Digital Photo Fantasy titles are provided free of charge but the author encourages a donation to the wilderness preservation society of your choice. Some good candidates for these donations are:
System Requirements
The CPU chip contained in the PC on which Digital Photo Fantasy is to be installed should be at least equivalent to an Intel 486 processor and should have an operating speed of at least 33 MHz. A Pentium processor with a speed of at least 90 MHz is preferred. Digital Photo Fantasy has not been tested on 386, 286 or lesser processors.
The video monitor connected to the PC on which Digital Photo Fantasy is to be installed should be of the Super VGA variety (256 colors) and should not be run in a mode which yields less than 600 horizontal by 480 vertical pixels. Running the monitor in the highest resolution mode possible is preferred.
The PC on which Digital Photo Fantasy is to be installed must be running Windows 95 or Windows NT. It is possible that it may work under Windows 3.1 or Windows 3.11 (Windows for Workgroups) if you have the necessary components for running 32-bit applications but I have no way of testing this.
Disk Storage Requirements
The complete installation of Digital Photo Fantasy will require approximately 50 megabytes of disk storage on your hard disk. This is only if the entire complement of bitmap images is installed. The minimum installation requirements are about 3 MB for the Digital Photo Fantasy executables and databases and another 3 MB for the Windows and Visual Basic support libraries (DLL, OCX, … files). Some of these support libraries may already exist on your system depending on what other applications you have installed. Each bitmap image that you install will require approximately 100 K bytes.
Installation and Setup
To install Digital Photo Fantasy you must first obtain a copy of one of the self-extracting Zip (GCSCRSAV.EXE, MBSCRSAV.EXE or JDSCRSAV.EXE) that contains all of the installation and setup components. You should place this file in a temporary directory and then execute it to have it explode out the files necessary to complete the installation. After the installation setup components have been extracted from self-extracting zip file you should execute SETUP.EXE to complete the installation.
Note: Each of the self-extracting zip files for the various versions of the package are virtually the same, with only a couple of files, the DIGITFAN.INI file and the initial start-up image, being different. You do not need to download all three zip files if you want all three versions.
When you start SETUP.EXE to begin the installation process you will first receive the following warning screen:
If you have any other applications open you should close them before proceeding with the installation.
The installation procedure will then ask you to verify the drive and path in which Digital Photo Fantasy should be installed. The default drive and path is C:\Program Files\Digital Photo Fantasy and it is recommended that this not be changed. Once the installation drive and path have been specified the installation process will continue. After you have done this you should press enter or click on the "OK" button. To abort the installation process at any time click on the "Cancel" button.
When the installation is complete you will see the following alert box:

The installation process described above will install only the basic Digital Photo Fantasy application. The images themselves are not installed by this procedure and can only be installed once the application itself has been installed. To install the bitmap images please refer to the section that describes Digital Photo Fantasy Location Setup function.
Starting Digital Photo Fantasy
To start Digital Photo Fantasy simply double-click on " Digital Photo Fantasy" icon in the " Digital Photo Fantasy" program group. Once started you will see a window similar to the following:

The image displayed will be that of the wallpaper file that is currently selected for the Windows desktop.
Location Setup
If this is the first time you are running Digital Photo Fantasy you will want to specify the setup for your location. To do this you should select Window and Setup from the menu. After you have done this you will see a window that looks like this:
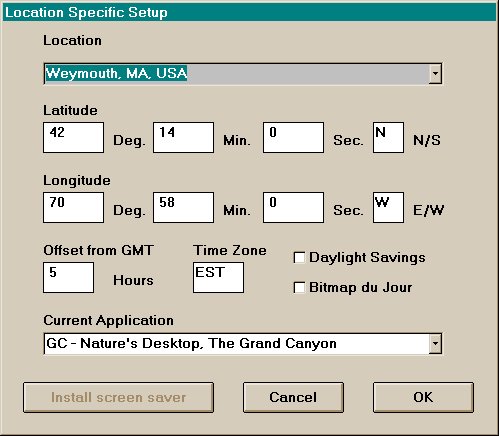
You should specify the name of your location in the Location box. The pull-down list associated with this box contains the names of all state capitols along with most other major cities in the United States and Canada. Selecting a city from this list will automatically set the latitude, Longitude, Offset from GMT (Greenwich Mean Time) and Time Zone for that location. If you do not select a city from the list you will need to supply this information manually. The N/S Latitude field should be "N" for locations north of the equator and "S" for locations down-under. The E/W Longitude field should be "E" if you are specifying longitude east of the Prime Meridian in Greenwich, England or "W" for west. The Offset from GMT is the number of hours your location is ahead of GMT. Time Zone is a non-validated text field used to represent the time zone of the location. Clicking the "Daylight Savings" check-box automatically toggles the location between standard and daylight savings time and adjusts the Offset from GMT and Time Zone accordingly. The information from these fields is used for sunrise, sunset, moonrise, moonset and moon phase calculations on the calendar.
The "Bitmap du Jour" check-box should be used be prevent the random wallpaper selection function from selecting a new wallpaper file every time Windows is started. If this box is checked then the random wallpaper function will only select a new wallpaper file if the date has changed since the last time it was run. More information on how to create a random wallpaper file each day or each time Windows is started is discussed further on in this document.
Location Setup - Install screen saver
The "Install screen saver" button will only be enabled if you have not yet installed the screen saver process. If you have already installed the screen saver process the button will be disabled (grayed-out or dimmed) and you will not be able to select it. Once the main Digital Photo Fantasy application is installed you should click on this button to install the screen saver process. When you do this a file called SSDIGFAN.SCR is copied from the directory in which Digital Photo Fantasy was installed to the main Windows directory (usually C:\WINDOWS).
Wallpaper File Selection
To manually select a new Windows wallpaper file you should select Window and Wallpaper from the menu bar. When you do this you will be presented with a window that looks like the following:
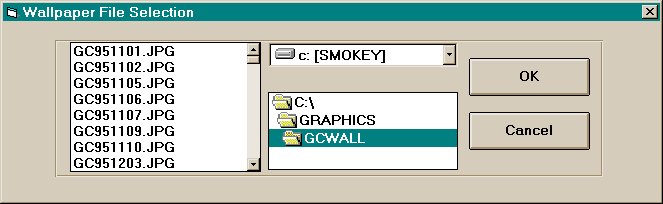
The list will contain the names of all of the bitmaps that are currently installed for your setup of Digital Photo Fantasy. You disk drive and path defaults to the location that was used to install the Digital Photo Fantasy bitmap images. To view bitmap images in the screen window simply click on the file names displayed. To keep the selected bitmap image and return to the main window press the "OK" button. To abort wallpaper file selection and restore the previously selected bitmap image, press the "Cancel" button.
Personal Calendar Management
To view the calendar for the current month, select Window and Calendar from the menu bar. The calendar for the current month will be displayed below the bitmap image window.

To view the memos or almanac data for a given date simply click on the date to view. Use the +Year and +Month buttons to move the calendar forward a year or a month at a time. Use the -Year and -Month buttons to move the calendar backwards.
Once a date has been selected a window similar to the following will be displayed:
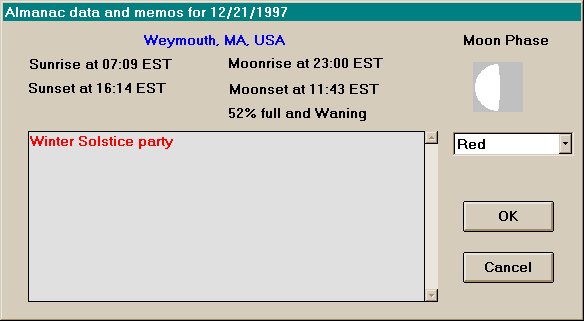
The date that you have selected is displayed in the title bar for the window. The name of your location as defined in the Location Setup screen is displayed below this and the times of local Sunrise, Sunset, Moonrise and Moonset for this location are also displayed. Below the Moonset time the percentage of full moon is displayed and to the right of this the actual moon phase is displayed.
The text box contains any memos that you have already entered for the given date. The color in which the text is displayed is determined by the color, pull-down list box below the Moon Phase. The color that is selected for the text is also the color that is used for the date on the calendar itself.
When you have finished making changes to the text or color press the "OK" button to write the changes back to the calendar database. Press the "Cancel" button to abort without saving the changes.
Wallpaper preview
To preview installed bitmap select Wallpaper and Preview from the menu bar. When in preview mode Digital Photo Fantasy will cycle through all of the installed bitmap images and display them one by one in the image window, along with the image description and filename.
To terminate preview mode and select the current image you should click the mouse on bitmap image. When you do this the image that you stopped preview mode remains in the image window.
Wallpaper selection
To select the image currently displayed in the image window as the Windows wallpaper file you should select Wallpaper and Select from the menu bar. When you do this a message is sent to Windows to reflect the change and you remain in the Digital Photo Fantasy application.
Editing the Image Database
To view and/or edit the Digital Photo Fantasy image database you should select Database and Images from the menu bar. When you do so a small window similar to the one below will be displayed below the image window.

When the window is first displayed the information for the currently selected image will be displayed. To cycle through the database use the arrow buttons:
To view the images as you cycle through the database, click the View On button. If images are being viewed the name of the button will change to View Off. To disable automatic image viewing, click the button again.
To delete an image from the database, click the Delete button. Note that this does not actually delete the image file from your hard disk, it simply removes the entry from the programs internal image table.
The Add and Update buttons are dimmed out until the program determines that they can be used. If you change the contents of either the filename or the description text boxes or the application drop down list, the Update button will be made available. If you change the contents of the filename text box the Add button will be made available.
To close this window, click the OK button.
Adding Your Own Images
To add your own images to the image database, select Database and Add from the menu bar. After doing this the following pop-up window will appear over the main window:
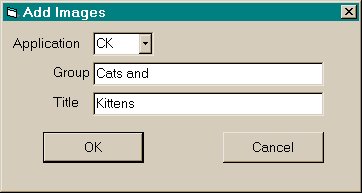
If the new image files are to be added to an existing "application" then select that application from the drop down box. To add a new application, type a two letter code for the new application and then supply some appropriate text for the application group and title. When you press Enter or click the OK button you will be prompted with a file open dialog window, which will allow you to select the images to be added to the image database.
Select the files that you wish to add and click the OK button to complete the operation.
When completed the new application will become the current application and the first image in the image set will become the default start-up image.
Exiting from Digital Photo Fantasy
To select the currently displayed image as the Windows wallpaper file and exit from Digital Photo Fantasy you select File and Exit from the menu bar.
To exit from Digital Photo Fantasy without changing the currently Windows wallpaper file you select File and Quit from the menu bar.
Random bitmap selection at Windows startup
The following procedure will allow you to setup a Windows Startup procedure that will cause Digital Photo Fantasy to select a random bitmap image, from the list of installed images to be used as the Windows wallpaper, each time Windows is started.
That's all there is to it. The next time you start Windows, Digital Photo Fantasy will run briefly to select a random bitmap image for the Windows wallpaper file and then exit. Please note that the "Bitmap du Jour" setting on the "Location Specific Setup" window controls how frequently a random bitmap will be selected by this procedure. If the "Bitmap du Jour" box is checked, then a random bitmap is only selected the first time you start Windows each day, hence the name. If the box is not checked, then a new random bitmap is selected each time you start Windows.
Screen Saver
Before you can use the screen saver functions you must copy the screen saver executable to the master Windows directory. To do this use the "Install Screen Saver" button on the "Location Specific Setup" window (select Window and Setup from the menu bar).
U the alternate mouse button to bring up the Windows 95 popup menu and select Properties and then the Screen Saver tab.
Once "Digital Photo Fantasy" has been selected you can click the "Setup" button to enter setup mode. A window similar to the following will be displayed:
Check the boxes for the screen savers that you would like to have active in the "Active Screen Savers" section. If more than one is active, one from the list will be selected at random each time Windows requests the screen saver to start.
Grand Canyon Image Sets
Image Set 1
|
GCBACAN.JPG |
Bright Angel Canyon, morning after snowfall, from outside Bright Angel Lodge |
|
GCBIRD.JPG |
Raven, Winter, Snow, South Rim |
|
GCBRIDGE.JPG |
Suspension bridges crossing the Colorado River, from River Trail |
|
GCDEER.JPG |
Young Mule Deer browsing for food on South Rim |
|
GCFOG.JPG |
Fog after a summer rainstorm |
|
GCFOSSIL.JPG |
Fossil scallop shell along Boucher Trail |
|
GCGMGSQR.JPG |
Golden-mantled ground squirrel along rim near Grand Canyon Lodge |
|
GCGORGE.JPG |
Cope Butte, inner gorge, Colorado River, Hermit Rapids from Mohave Point, Hermit Road, south rim |
|
GCJOLIE.JPG |
Lingering clouds after a snowstorm |
|
GCLIZARD.JPG |
Collared lizard sunning on rocks near Cottonwood Camp on North Kaibab Trail |
|
GCLYNX.JPG |
Lynx tracks in fresh snow along Dripping Springs Trail |
|
GCMULE.JPG |
Mule train coming down South Kaibab Trail with supplies for Phantom Ranch |
|
GCPALSAD.JPG |
The Palisades of the Desert from along the Escalante Route |
|
GCRBNFL2.JPG |
Close-up of travertine formations below Ribbon Falls |
|
GCRIVER2.JPG |
The Colorado River along the River Trail |
|
GCSNOW.JPG |
Bright Angel Canyon, clearing winter storm |
|
GCTANBCH.JPG |
Colorado River at Tanner Beach |
|
GCTANNER.JPG |
Section of the Tanner Trail |
|
GCTONTO.JPG |
Colorado River, inner gorge from Tonto Trail just west of Hance Canyon |
|
GCTONTO2.JPG |
Tonto Trail between South Kaibab and Bright Angel Trails |
|
GCTRAIN.JPG |
Grand Canyon Railroad #18 |
|
GCTREE.JPG |
Dead Pinon Pine along the South Kaibab Trail |
|
GCUNKAR.JPG |
Unkar Creek Delta as seen from Escalante Route |
|
GCWALL.JPG |
Lone Pinon Pine and Zoroaster Temple from Yaki Point |
|
GCWATCH.JPG |
Tanner Canyon and the Watchtower |
Image Set 2
|
GCBACAN2.JPG |
Bright Angel Canyon after winter storm, from Yavapai Point |
|
GCBW.JPG |
The Grand Canyon |
|
GCBWTREE.JPG |
Tree along Rim Trail |
|
GCCALM.JPG |
Calm water above Hance Rapids |
|
GCDRFTWD.JPG |
Pile of driftwood washed ashore at Hance Beach |
|
GCGORGE2.JPG |
Colorado River, inner gorge from Tonto Trail just east of Monument |
|
GCGRANRP.JPG |
Granite Rapids |
|
GCKAIBAB.JPG |
South Kaibab Trail after a major winter storm |
|
GCOLRIV.JPG |
The Colorado River from Mather Point |
|
GCRAPID.JPG |
Upper section of Tanner Rapids |
|
GCRBNFLS.JPG |
Ribbon Falls along the North Kaibab Trail |
|
GCREDCN2.JPG |
The floor of Red Canyon, New Hance (Red Canyon) Trail |
|
GCREDCYN.JPG |
Red Canyon as viewed from the rim |
|
GCREEDS.JPG |
Reeds near the mouth of Red Canyon |
|
GCRIVER.JPG |
Close-up of Colorado River and delta near mouth of Tanner Canyon |
|
GCRIVRUN.JPG |
River runners shooting Hance Rapids |
|
GCTONTO3.JPG |
Snow on the Tonto Plateau |
|
GCUNKAR2.JPG |
Unkar Creek canyon, delta and rapids from the Escalante Route |
|
GCUNKAR3.JPG |
Close-up of Unkar Creek canyon, delta and rapids from the Escalante Route |
|
GCUNKAR4.JPG |
Colorado River heading west from Unkar Creek overlook on the Escalante Route |
|
GCZORAST.JPG |
Zoroaster Temple from Clear Creek Trail |
|
GCZOROS2.JPG |
Zoroaster Temple after winter storm |
|
LG_ANGEL.JPG |
Angel's Window, Cape Royal, north rim |
|
LG_BAPNT.JPG |
Sunrise, Bright Angel Point, north rim |
|
LG_CRINO.JPG |
Crinoid (Sea Lily) stem fossils near Widforss Trail |
|
LG_HAYDN.JPG |
Mount Hayden, Point Imperial, north rim |
|
LG_UNKAR.JPG |
Unkar Creek area, Vista Encantada, north rim |
Image Set 3
|
GC951101.JPG |
Moon, sunsrise, head of Tanner Canyon |
|
GC951102.JPG |
Early morning in upper reaches of Tanner Canyon |
|
GC951105.JPG |
The Palisades of the Desert, Marble Canyon, Colorado River from Tanner Trail |
|
GC951106.JPG |
The Palisades of the Desert, Marble Canyon, Colorado River from Tanner Trail (close-up, large) |
|
GC951107.JPG |
Hoodoos in Tanner Canyon |
|
GC951109.JPG |
The Palisades of the Desert as seen from just below Tanner Rapids at the Colorado River |
|
GC951110.JPG |
Palisades of the Desert, Comanche Point, Tanner Trail |
|
GC951203.JPG |
View of Colorado River from high section of Beamer Trail just north of Palisades Creek |
|
GC951204.JPG |
View of Colorado River and Chuar Butte as seen from high, northern section of Beamer Trail |
|
GC951205.JPG |
Close-up of Colorado River and gorge as seen from high, northern section of Beamer Trail |
|
GC951206.JPG |
Confluence of Colorado and Little Colorado Rivers as seen from Beamer Trail near northern terminus |
|
GC951207.JPG |
Shell fossil along Beamer Trail |
|
GC951305.JPG |
Cliffs and river below Unkar Creek overlook |
|
GC951308.JPG |
Ruins of Anasazi dwelling just east of Unkar Creek overlook |
|
GC951309.JPG |
View of Colorado River and Palisades of the Desert looking over west wall of ruins |
|
GC951311.JPG |
View of ruin looking east |
|
GC951402.JPG |
Clouds, fog and snow from Tanner Trail just below Redwall ascent |
|
GC951403.JPG |
Clouds, fog, snow and Colorado River from Tanner Trail just above Redwall ascent |
|
GC951404.JPG |
Clouds, fog and snow from Tanner Trail just above Redwall ascent |
|
GC951405.JPG |
Junction of east and west arms of Tanner canyon, snow, clouds, fog and watch tower at Desert View |
|
GC951406.JPG |
Stegosaurus Rocks and upper sections of western arm of Tanner Canyon as seen from Tanner Trail |
|
GC951407.JPG |
View of Unkar Creek area from overlook at Moran Point |
|
GC951501.JPG |
Sunrise, O'Neill Butte, Yaki Point |
|
GC951502.JPG |
The Watchtower at Desert View |
Image Set 4
|
LG952004.JPG |
Bridger's Knoll from Bill Hall Trail |
|
LG952011.JPG |
Deer Spring from Deer Creek Trail |
|
LG952013.JPG |
Deer Spring from Deer Creek Trail (close-up) |
|
LG952017.JPG |
Deer Creek Falls at the Colorado River |
|
LG952021.JPG |
Deer Creek Falls at the Colorado River (close-up) |
|
LG952022.JPG |
Deer Creek Trail through the Narrows section of Deer Creek |
|
LG952038.JPG |
Tapeats Creek canyon from Thunder River Trail |
|
LG952040.JPG |
Thunder River from Thunder River Trail (side view) |
|
LG952043.JPG |
Thunder River from Thunder River Trail (large) |
|
LG952047.JPG |
Confluence of Tapeats Creek and the Colorado River |
|
LG952050.JPG |
Tapeats Creek and the Colorado River from top of draw |
|
LG952057.JPG |
Lower section Tapeats Creek and gorge |
|
LG952059.JPG |
Lower section of Tapeats Creek and gorge |
|
LG952060.JPG |
Tapeats Creek above the gorge |
|
LG952065.JPG |
Thunder River Trail along Tapeats Creek |
|
LG952068.JPG |
Thunder River descending towards Tapeats Creek |
|
LG952078.JPG |
Tapeats Creek looking north from Upper Tapeats Campground |
|
LG952081.JPG |
Tapeats Creek looking north from Upper Tapeats Campground |
|
LG952086.JPG |
Upper section of Thunder River |
|
LG952087.JPG |
Thunder River trail heading west through Surprise Valley |
|
LG952088.JPG |
Surprise Valley heading west towards Deer Creek |
|
LG952094.JPG |
Eastern portion of Surprise Valley and Inner Gorge as seen from rim of the Esplanade |
|
LG952095.JPG |
Strange rock formations on the Esplanade (petrified Jupiter II spacecraft?) |
|
LG952097.JPG |
Strange rock formations on the Esplanade |
|
LG952098.JPG |
View from the Esplanade looking east towards Bridger's Knoll and Monument Point |
|
LG952103.JPG |
The Esplanade along the Thunder River Trail |
Image Set 5
|
LG952025.JPG |
Utah Snowberry |
|
LG952026.JPG |
Hairy Fleabane |
|
LG952028.JPG |
Hedgehog Cactus |
|
LG952029.JPG |
Brittlebush |
|
LG952033.JPG |
Arizona Stemless Hymenoxys |
|
LG952034.JPG |
Wheeler Thistle |
|
LG952035.JPG |
J-Random Grass |
|
LG952061.JPG |
Cactus garden along Thunder River Trail |
|
LG952062.JPG |
Prickly Pear cactus |
|
LG952063.JPG |
Longleaf Phlox |
|
LG952090.JPG |
Sego Lily |
|
LG952091.JPG |
Spreading Phlox |
|
LG952093.JPG |
Buffaloberry |
|
LG952099.JPG |
Grizzly Bear Cactus |
|
LG952104.JPG |
Spreading Phlox |
|
LG952105.JPG |
Wyoming Paintbrush along Bill Hall Trail |
Image Set 6
|
LG961111.JPG |
Inner gorge, Granite Rapids and Tower of Set from Pima Point, Hermit Road, south rim |
|
LG961127.JPG |
Duck-on-a-rock, Desert View Drive, south rim |
|
LG961133.JPG |
South Kaibab Trail beyond Cedar Ridge, switchbacks descending to Tonto Platform |
|
LG961228.JPG |
Obstacle Falls, Clear Creek |
|
LG961307.JPG |
Anasazi granary and metates, Obi Canyon ruin, Clear Creek area |
|
LG961310.JPG |
Pottery shards, Obi Canyon ruin, Clear Creek area |
|
LG961420.JPG |
Artist at work near Grandeur Point, Rim Trail, south rim |
|
LG961421.JPG |
Bright Angel Trail from Grandeur Point, Rim Trail, south rim |
|
LG962134.JPG |
Trail heading from Nankoweap Creek to boat beach, Nankoweap Trail |
|
LG962138.JPG |
View of river from trail leading to Nankoweap granaries, Nankoweap Trail |
|
LG962204.JPG |
Nankoweap granaries and Colorado River, Nankoweap Trail |
|
LG962206.JPG |
Nankoweap granaries, Nankoweap Trail |
|
LG962214.JPG |
Cottonwood and Mount Hayden from Nankoweap Creek |
|
LG962222.JPG |
Interesting rock patterns in the bed of Nankoweap Creek |
|
LG972307.JPG |
Rainbow over Zoroaster Temple |
|
LG972416.JPG |
Cheyava Falls, Clear Creek |
|
LG972422.JPG |
Panorama of sunrise on the south rim from the Clear Creek Trail |
|
LG972438.JPG |
Approaching Phantom Ranch area on the Clear Creek Trail |
|
LG972439.JPG |
Panorama of south rim from Clear Creek Trail |
|
LG972519.JPG |
Pinyon Jay |
Image Set 7
|
GCR1004L.JPG |
Fort Lee and trading post |
|
GCR1006L.JPG |
Lee's Backbone |
|
GCR1010L.JPG |
Approaching Navajo Bridge |
|
GCR1029L.JPG |
View up river from Anasazi ruin |
|
GCR1035L.JPG |
Vasey's Paradise |
|
GCR1039L.JPG |
Redwall Cavern |
|
GCR1041L.JPG |
Drifting, cliffs |
|
GCR1045L.JPG |
Fossil Nautiloid |
|
GCR1053L.JPG |
Mule deer in Saddle Canyon |
|
GCR1054L.JPG |
Waterfall in Saddle Canyon |
|
GCR1072L.JPG |
Turquoise waters of Little Colorado |
|
GCR1076L.JPG |
Beamer Cabin |
|
GCR1088L.JPG |
Downriver towards Tanner Canyon |
|
GCR1090L.JPG |
Rafts & cliffs |
|
GCR1092L.JPG |
Petroglyphs |
|
GCR1104L.JPG |
Western Collared Lizard, female |
|
GCR1116L.JPG |
Ross Wheeler |
|
GCR1117L.JPG |
Drifting |
|
GCR1118L.JPG |
Elves Chasm |
|
GCR2007L.JPG |
Morning sun on the Tapeats |
|
GCR2016L.JPG |
Stone Creek Falls |
|
GCR2025L.JPG |
Moon setting over wall |
|
GCR2036L.JPG |
View from behind Dutton Spring |
|
GCR2051L.JPG |
Deer Creek, Looking back upstream |
|
GCR2057L.JPG |
Deer Creek Falls, Robin |
|
GCR2073L.JPG |
Vulcan's Anvil |
|
GCR2077L.JPG |
Scouting Lava Falls |
|
GCR2104L.JPG |
Lava Falls |
|
|
|---|
|
|---|